Part II: Starting the Forcing Process
Ok. So you’ve decided to try your hand at forcing some flower bulbs (or your lack of time to plant the fall bulbs you purchased has decided it for you). Let’s start the process!
- First off, you will want to decided HOW and WHERE you want to chill your bulbs. This will be largely dependent on what “chilling” resources you have available to you and also how much space you can afford to use. Ask yourself these questions: do I have any location (such as a garage, basement, shed, attic, etc.) that remains 50°F (10°C) or below and is fairly dark? Keep in mind that this area should not receive freezing temperatures for any length of time. If you do not have any such location, a refrigerator will work as well but is a tad bit more prohibitive based on a lack of space. Plus, depending on your family’s acceptance of your hobby, you may not want flower bulbs in your refrigerator besides last night’s leftovers 🙂
- Chilling Temperature: Regardless if you are chilling them in a refrigerator or other location, it will be very

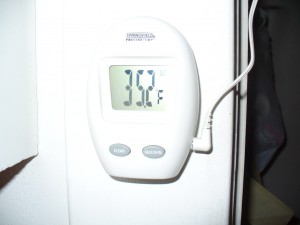
An inexpensive digital thermometer can take the guess work out of selecting an area adequate for cold storage.
important to keep tabs on the temperature in the given area. I recommend purchasing a digital thermometer (you can find one fairly inexpensive at your local garden center or hardware store) which you can place in the designated area. Look for one with an extension wire so that you can place the receptor directly in the chilling area. Or better yet, if you’re willing to invest a little more, purchase a wireless thermometer which can receive the transmittal several hundred feet away to easily keep tabs on the location without being near it. Most of these thermometers are available for under $30.00. Ideally, the temperature in your chilling area should always remain between 35°F and 48°F.
- Refrigerator Chilling: One thing to keep in mind about chilling the bulbs in a refrigerator is the presence of produce (fresh fruits and vegetables). As fruits and vegetables ripen, they produce a gas called ethylene. This gas is somewhat a double-edged sword as it helps to signal to other fruits and vegetables to ripen but also can cause produce to ripen too quickly, therefore causing it to rot. Remember the old trick of placing bananas in a paper bag to get them to ripen faster? This is because you are essentially trapping the ethylene in a small space. This same thing is happening in your refrigerator at all times, giving the ethylene no where to go. Unfortunately, this gas has the same affect on bulbs and therefore, you will want to keep your refrigerator as free from produce as possible during the chilling period. This makes chilling your bulbs in a refrigerator a little more difficult unless you have a secondary refrigerator where you do not store your apples, pears, salads, etc.
- Garage/Shed/Basement/Attic Chilling: Monitoring the temperature in an “uncontrolled” space will be extremely important. If there is a chance that the space will dip below freezing for any length of time, you will need to protect the bulbs by slightly insulating them. This can be done by wrapping the bulbs or pot (depending on how you are chilling, see following steps) with a material such as bubblewrap, a blanket, or burlap. It is EXTREMELY important that the bulbs are not allowed freeze solid. Doing so will cause them to rot and turn to mush once they thaw in the spring. Keep in mind that you are attempting to create the same process which would occur naturally outdoors artificially indoors. When a bulb is planted in a garden, even though the temperatures outdoors may dip below freezing for sometimes months at a time, this frost is evenly distributed over much more surface area. This means that the bulbs are not allowed to freeze as solid as they would if they were more exposed.
- Next, you will want to determine how you will chill the bulbs. There are two different options: one is to plant the bulbs in pots prior to chilling them and the other is to plant them after the chilling period has past. There are advantages and disadvantages to both. The advantage to planting them prior to chilling is that it will be unnecessary to do so later once the bulbs have been chilled. If the bulbs begin to sprout or grow roots, they will already be at home in the soil and not have to go through the stress of being planted once actively putting on growth. However, having the bulbs planted in pots unfortunately takes up quite a bit of room. If space is an issue, you may opt to chill them in paper bag. If this is your case, be sure to cut adequate ventilation in the bag to allow for the release of ethylene which the bulbs will naturally produce. Overall, chilling while planted in pots is recommended and tends to yield more favorable results.
- If chilling the bulbs in pots, chose a container with adequate drainage holes. If the pot you desire to use does
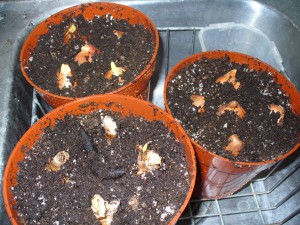
not have holes for drainage, place a 1-2″ layer of stone or gravel in the bottom prior to filling with the soil. One of the most important things to remember when growing bulbs (whether doing so through forcing or naturally outdoors) is that bulbs require moisture with perfect drainage in order to be success. Therefore, use a medium that has equal parts peat moss, potting soil, sand, and vermiculite/perlite. You can use a typical potting soil with the addition of peat moss. Fill the container, leaving just enough room at the top to plant the bulbs. The bulbs should be placed in the soil, pointed ends up as close together as possible. The tops of the bulbs should just reach the rim of the container. Once the bulbs are planted and covered with soil, water the bulbs thoroughly, allowing the soil to settle around the planted bulbs. I recommend keeping some kind of log, describing which bulbs are planted in which container, the date they were planted, and your anticipated date to bring them out of cold storage.
- Once you have either placed your bulbs in ventilated bags or potted them, move the bulbs to your chilling area. If the area tends to receive too much light, place a large bucket or box over the pots to shield them as much as possible. If you have decided to plant your bulbs in containers, these containers can be planted out-of-doors in the ground, keeping the rim at the soil surface. This can be a good option if you are intending to keep the bulbs in the pots for the growing season but not necessarily in the garden. This will allow the bulbs to receive the chilling period but will make them “mobile” once they are in bloom to use on a patio or deck.
- The forcing process will take approximately 10-16 weeks total. After 5 or 6 weeks, the roots will begin growing. Early blooming spring bulbs (such as crocus and snowdrops) will take about 12 weeks until they are in full bloom. Mid-spring bloomers (such as daffodils, hyacinth, and some tulips) will take approximately 14 weeks, whereas the rest of the tulips can require the full 16 weeks to bloom. I will discuss this in further detail in the next forcing blog article 🙂
- While chilling the bulbs, it is important to remember to keep the bulbs damp but not wet. I recommend the “misting method” with a cheap plastic spray bottle. Be sure not to over water and try to keep in mind the amount of moisture the bulbs would be receiving if planted outdoors under a snow cover.
This should get you started in the forcing process. Once these steps are done, you’ll be well on your way and you can sit back and relax! I am so looking forward to the thrill of seeing those sprouts begin. In the next blog, I’ll talk about the number of cold weeks required for different varieties and also explore some other ideas relating to forcing. Good luck and have fun!


